I just helped curate the Dorsky's Videofreex exhibit last Thursday with two other students from my class. We were in charge of collecting and reviewing video submissions for the "Elements" theme of the week. A few important questions were raised during our time down in the museum. For one thing, are we as curators actively deciding what should and should not go into the exhibit? If the video meets all other guidelines, who are we to question the artist's message and say it doesn't fit the theme or our narrow definition of what art is?
We came across one video in particular that caused a lot of discussion. It was a video of a male and female student sitting on a bed. There were large reflective balls of various sizes in the background and the boy was wearing a bandana covering his mouth and nose. The girl was holding a cat and the boy was talking to it and stroking it with what we believe was a fake dagger or knife. At first, the video started out okay, he was just waving the knife in the air. The others questioned if it fit the theme, but again, who are we to argue with their vision? What if the mirrored balls symbolized water and the boy's personality was the fire aspect of the video? That was my original plan for my own elements video - to have different dancers and dances represent different elements in their speed and personality. I was ready to put the video into the exhibit, but then we saw the boy press the dagger to the cat's neck. Immediately, we deleted the video and took it off of the list of accepted entries. As soon as the video suggested cruelty to animals, or just cruelty in general, I think the curator does have the ability to step in and take it out. Of course, the artist could have created a provocative video intended to shock the audience, but I feel as if this was not the case. I think this experience was very helpful and let us engage in a dialogue about the curator's role and how much power they should be allowed to have. This also relates to the material we just covered in my Art of the Later 20th Century class. We just had a lesson on Fred Wilson and discussed the artist as a curator. Essentially, it's the same as what we did for this class. Instead of using art/sculptures/tools made by others, we also have our own creations submitted for the exhibit. This creates a bias towards videos created by people in our own class as those automatically get added to the exhibit with little critique or questioning. If that video had been a submission from our own class, there's a good change it would have been included, or at least considered more. Just something to think about next time I have the power to decide what counts as art and what should be included in a exhibit open to the community.
Monday, April 27, 2015
Sunday, April 26, 2015
Kickstarter Research
Just found a very interesting kickstarter project that fits well with the class curriculum. It's a delta 3D printer called Tiko that's cheap ($179 per unit) and unibody. This means that it is easy to assemble, manufacture, and according to the website, almost impossible to misalign.
https://www.kickstarter.com/projects/tiko3d/tiko-the-unibody-3d-printer?ref=category_popular
I looked at their kickstarter video to see what they did and how it can help my group with our video presentation. For one thing, it's short and to the point at only one minute and forty-nine seconds. It starts off by introducing their team of innovators and then it gets into how regular 3D printers are faulty, time consuming, and fall short of our expectations. They used words like "heavy," "overcomplicated," and "unreliable" and put the words on the screen to emphasize their point. Then they introduced their design as the answer to all of our problems showing a video of it in the process of printing out an object. Next, they compared other printer frames with multiple pieces to unsteady lego sets. Once they got the comparison out of the way, they went into specifics about the printer, like automated shut off, wireless connectivity, cloud-based software, the max volume it can print and other special features. At the end of the video, they sum up their goals of having everyone be able to own a 3D printer and say that's why they kept the price so low. The commercial ends with "Imagine what you could build. Back us today and let's find out."
I think this commercial set up could definitely work with my group's project proposal. We're designing an interactive kiosk that could replace bulletin boards on campus. I agree we should start the video by stating the problem. We could show pictures that I took of the either too cluttered or too empty boards around campus and maybe throw in some statistics from my poll. After that, we should offer up our solution to the problem and then go into details about what it can do. I'm worried the design students in my group are trying to make the video more complicated than it needs to be, but we'll see. I wanted to make a website, but can't really argue with them since it's their part of the project and they're the ones with the digital skills. I'm hoping my group can come to some sort of agreement on the video tomorrow (Monday) and hopefully start storyboarding so we're ready to film on Thursday.
Thursday, April 16, 2015
Update on 3D printed prosthetic
So here's the updated version of my original Tinkercad design:
https://www.tinkercad.com/things/bwhxApZD3iR-3d-hidden-blade-prosthetic-revised/edit
I went in and remeasured everything, making the base a little higher and longer so pens can fit in it. I also changed the size of the horseshoes since before they were too small to print and made them bigger. I decided not to print out the rod altogether, instead borrowing the metal rod to one of my brother's old car sets. I also went to Michaels and bought some Velcro that's smaller than the bands I was originally going to use. As a result, I had to change the hole sizes in my actual base design and at this point, I'm just hoping everything fits together. I have an hour until class and the 3D printing lab just sent me an email saying that I can come pick up my design. Let's hope everything actually fits together and works this time (fingers crossed).
I'll put out another update once I have my design completed, put together, and hopefully working.
Sculptris Design

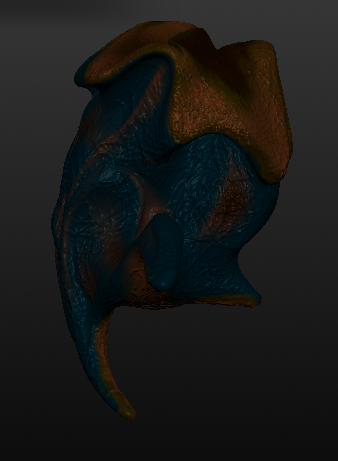

So here's my final Sculptris design. Funny enough, I spent forever trying to make a head, then I got frustrated so I took the grab tool (which I hadn't used before) and I just slashed it through the guy's head. It formed these cool tentacle things, so I made more of them and turned my original design into an octopus/squid thing. I used the paint bump tool and a tiny brush size to make the bumpy texture that covers the thing's body.
Tuesday, April 7, 2015
DIY Prosthetic Project
So for my next project, I am in the process of creating a 3D printed DIY prosthetic. After drawing with my feet and mouth for my Spring break homework, I realized how vital control and pressure are to prosthesis designed to help amputees produce art. I also realized that working with ones' arm is the most logical solution because it would still possess some fine motor skills even if the hand or some fingers were missing.
When designing, you have to think about the universality of your design. Are you making an attachment for an already existing prosthetic? Will your design only work with one specific pen/paintbrush/etc., and how can you generalize your design? Since I decided to create a prosthetic that could hold a pen or pencil, I knew I would have to create a very general design that could fit multiple brands. My design also had to give the user easy access to the drawing tools so they could quickly replace them. I decided to make a device that attached to the wrist that way it was useable no matter how many fingers the person had.
My design was loosely inspired by the hidden blade seen in Assassin's Creed. For my research, on top of making cardboard models, I also watched tons of Youtube videos on hidden blade construction. Initially, I wanted to make a spring loaded design that would make a pen or pencil pop out, but later I simplified it to just a pen/pencil holder.


cardboard model
I built my design on Tinkercad off of a hidden blade design I found on Thingiverse called "Hidden Blade!" by Theprintrbotmaker. Here's what it looks like at the moment:


Right now, a lot of the parts I created are too small to print out properly, so I'm in the process of making them bigger and trying to get the back to actually work.
Subscribe to:
Comments (Atom)